
Takeoff by hand
Takeoff: Edit by hand
The takeoff canvas's full toolbar. Every part of the screen, every tool, and where to read more.
Most of the time you only check and approve what crux measured, in the canvas's simple mode (see Takeoff). When you want to measure, fix or style shapes yourself, turn on Edit by hand at the top right of the canvas. crux remembers your choice. The examples use the painting pack; every trade, and the GC pack, uses the same canvas.
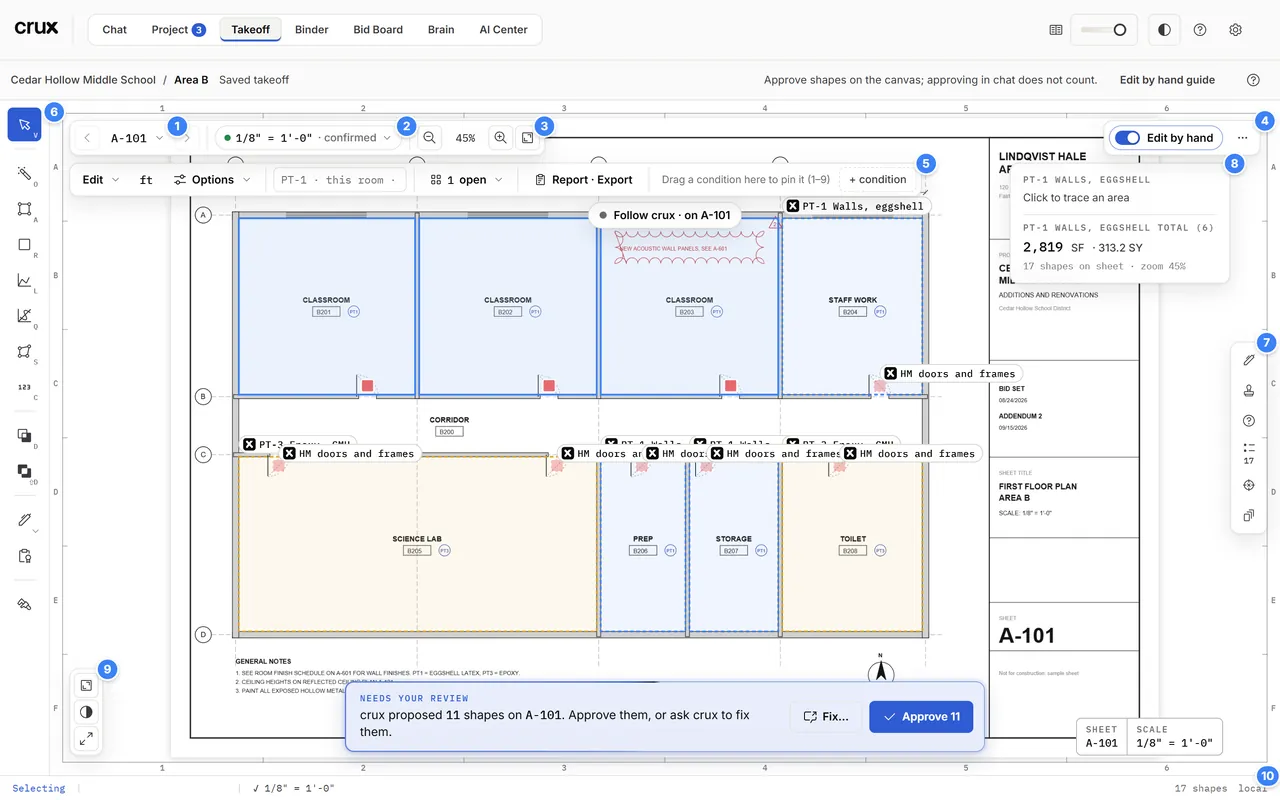
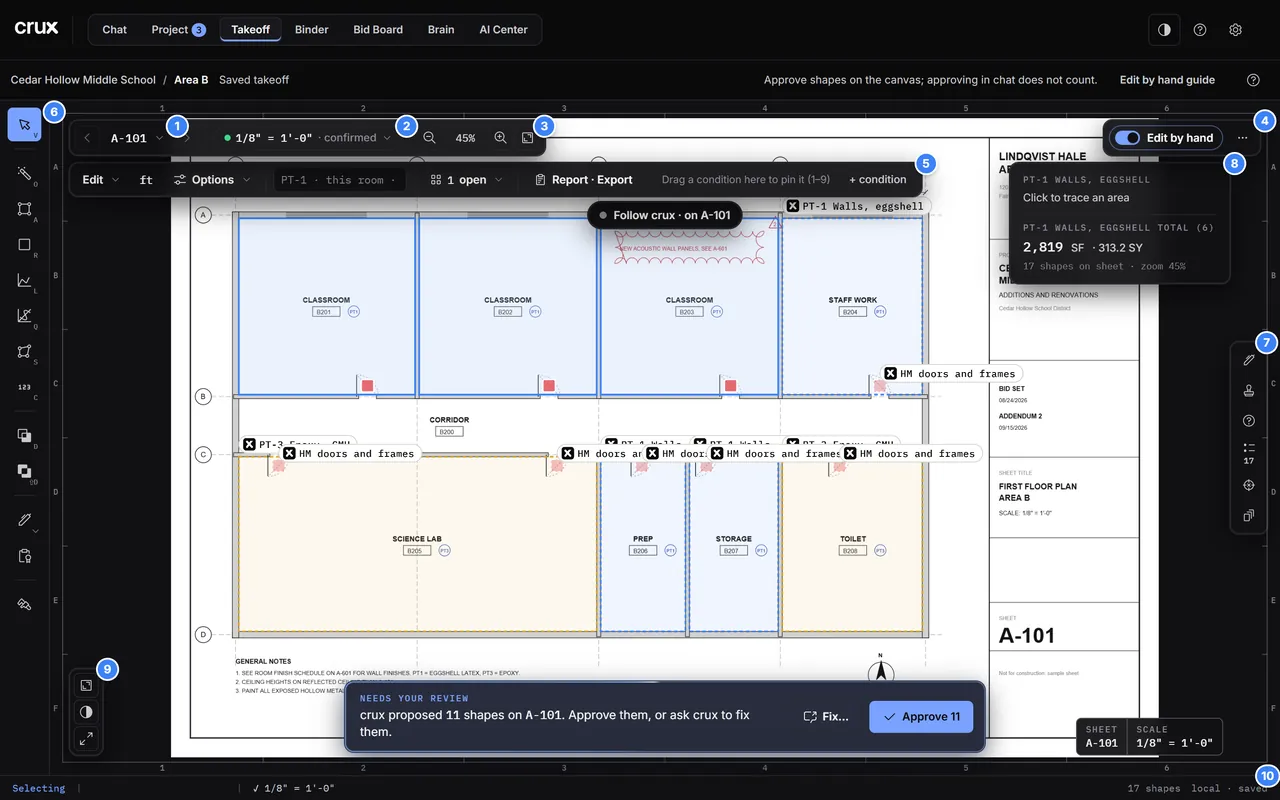
The parts of the screen
| # | Part | What it is |
|---|---|---|
| 1 | Sheet | ‹ and › step through the sheets; click the sheet name for the list of sheets and files, grouping and the gallery. See Select and navigate. |
| 2 | Scale chip | The sheet's scale and whether it is confirmed, for example 1/8" = 1'-0" · confirmed. Amber means it needs you. See Scale and calibrate. |
| 3 | Zoom | zoom out, the zoom percent, zoom in, fit the sheet. |
| 4 | Edit by hand and More | The switch back to simple mode, and the menu with All sheets, Report · Export, Open plans, How crux works and Import from schedule. |
| 5 | Tool row | Edit menu, ft / m, Options, the label picker, the command box, the open sheets, Report · Export, the pinned conditions and + condition, and Finish or Create while you draw. |
| 6 | Tool rail | The drawing tools, in groups: select, measure, cut, mark (markups and the approval stamp), calibrate. Each shows its shortcut in its corner. |
| 7 | Panels | Markups, Stamps, RFIs, Takeoffs, Agent, Layers (CAD sheets only) and Revisions. |
| 8 | Live readout | The active condition, what the armed tool needs next, and the condition's running totals. |
| 9 | Corner tools | fit, invert the sheet (a negative print), focus mode (F) to hide the chrome. |
| 10 | Status bar | What you are doing, the pointer position, the scale, the last message, the shape count and saved. |
The tools at a glance
| Tool | Key | What it does | Guide |
|---|---|---|---|
| Select | V | Pick, move and reshape shapes; drag open canvas to pan | Select and navigate |
| One-Click Area | O | Click inside a room; it traces itself | Measure |
| Area | A | Click around a space, point by point (SF) | Measure |
| Rectangle | R | Two corners (SF) | Measure |
| Linear | L | A run of straight lines (LF) | Measure |
| Curved Line | Q | A smooth curve through your clicks (LF) | Measure |
| Surface Area | S | A wall run in plan × the condition's height (wall SF) | Measure |
| Count | C | One click, one EA | Measure |
| Deduct shape | D | Cut a hole out of an area | Cut and split |
| Deduct rectangle | Shift+D | Cut a rectangle out of an area | Cut and split |
| Markup | H for the highlighter | Clouds, callouts, text, highlights: notes, never measured | Markups, stamps and RFIs |
| Approval stamp | none | Your ink: approve a takeoff or a sheet | Markups, stamps and RFIs |
| Calibrate | none | Set the scale from a known dimension | Scale and calibrate |
| Check a dimension | K | Check the scale against a printed dimension | Scale and calibrate |
| Zone check | none (in Options) | What is inside a region, without changing the takeoff | Measure |
| Conditions | 1 to 9 | Make a pinned condition active | Conditions and styling |
Other keys: G all sheets, F focus mode, ? the canvas's quick reference, Esc back out one step, Enter finish a shape, Backspace remove the last point, Ctrl+Z undo, Ctrl+Shift+Z redo. Letter keys do nothing while you type in a box or while a menu is open.
Rules the canvas keeps
- No scale, no quantity. Until a sheet's scale is set, every measuring tool except Count refuses. Set and confirm the scale first: Scale and calibrate.
- A click places a point; a press-and-drag moves the drawing. Mid-trace, a drag never adds a point.
- What crux drew stays dashed until you approve it, and only the canvas approves: the Approve bar, a shape's card, or the approval stamp.
- Quantities come from the drawing's lines at the sheet's scale. A scanned sheet has no lines to measure: trace it by hand, or take the sizes from the printed dimensions.